August 25, 2014
iambiebs | Make A Comment | nerdisms, Tech
 For many years I have been an anti-apple advocate in some ways I still am because I feel Apple PCs are just a status symbol. When someone tries to tell me that their Mac is superior than the pc I know and love that’s when I get upset. It is that elitest mind set that sometimes comes with that apple. Now I can not say that that same attitude doesn’t come from windows fans, it does. I use to be that way, but in the last year or so I have changed from that. Today’s Macs are no different than the windows laptop I carry with me each and everyday. Albeit a very expensive brand name that you are paying for. They are no different.
The time for dividing computers into “PCs” and “Macs” is over. With more and more people are using mobile devices like smartphones and tablets, Mac OS X is just another PC operating system alongside Windows and Linux.
The Historical Meaning of “PC”
“PC” has several different meanings. On one extreme, PC just means “personal computer,” and smartphones and tablets are just as much PCs as laptops and desktops. On the other extreme, “PC” originally meant “IBM PC-compatible.” These were computers that were compatible with IBM’s PC architecture. They had a BIOS and could run all the same operating systems, like IBM’s PC-DOS and Microsoft’s MS-DOS. This was a standard architecture computers could conform to so they’d be compatible with the software that ran on other IBM PCs or IBM PC-compatible PCs. IBM no longer makes PCs, so this description isn’t accurate.
IBM PCs became less common and eventually vanished, so the term”IBM PC-compatible” fell out of favor. “Wintel” PCs replaced them — Windows-compatible PCs with an Intel x86 chip inside.
People continued to use the term “PC” for those Windows-on-Intel-x86 machines. But there was nothing intrinsically Windows-only about a PC. PCs originally ran DOS, and today many PCs run Linux. There have been other PC operating systems like IBM OS/2 and BeOS, too. “PC” may be synonymous with Windows to many people, but it shouldn’t be — Linux is also a PC operating system.
Macs Moved From PowerPC to Intel
In the past, a Macintosh’s hardware was very different from a PC’s. Where those Wintel PCs had Intel x86-compatible chips inside, Macs had PowerPC chips. PowerPC was a completely different architecture, so Windows just couldn’t install on a Mac, and Mac OS just couldn’t install on a PC. The difference wasn’t just the operating system, it was the architecture. That’s why a computer that came with OS/2 or BeOS could be considered a PC, but a Mac wasn’t a PC — it wasn’t “PC-compatible.”
In 2006, Apple began transitioning Macs to run on Intel’s x86 chips instead of the PowerPC architecture. This wasn’t just swapping out a chip manufacturer — Mac OS transitioned from being a PowerPC operating system to being an x86 operating system. Macs now use the same Intel chips found in “PCs.” The last version of Mac OS X to even run on PowerPCs at all was Mac OS X 10.6 Snow Leopard back in 2009.
Macs and PCs Have the Same Hardware
Some people seem to think that the hardware in a Mac is very different from the hardware in a PC, but this isn’t true.
The CPU in a Mac is the same Intel CPU you’ll find in Windows based machines. Companies like Samsung, Toshiba, and SanDisk provide the solid-state drives used in a Mac — these are the same SSDs you would buy off the shelves to put in a “PC”, too. LG and Samsung make the displays for the majority of the worlds computers.
Windows, Linux, and Mac Are All PC Operating Systems
In the past, you couldn’t run Windows on a Mac without an emulator. Now, Windows can be easily installed on a Mac. You can install the standard version of your Linux distribution of choice on a Mac, too.
Mac OS X can even be installed on PC hardware — this is what’s known as a “hackintosh.” It isn’t officially supported by Apple. However, it’s possible because you can get PCs with the same hardware as to what you’d find in a Mac. Those hardware drivers Apple writes specifically for its Mac hardware can work just as well on that PC with the same hardware.
Macs are PCs — nice and expensive ones, but PCs nonetheless.
August 8, 2014
iambiebs | Make A Comment | nerdisms, Tech

TL;DR you can never have too much memory unless you have a 32bit OS then you are limited to 3.5 GB of memory
Memory is a very important part of a PC. the best way to describe RAM I have found is using a table and open books where the open books represent programs. The amount of RAM you have is the size of said table. The larger the table the more books you can have open at one time. The more RAM you have the more programs you can have running. The only time you would ever be limited is if your are running a 32 bit OS, because you can not use more than 3.5 GB of ram with a 32bit OS. with a 64 bit OS you can use a lot more. Theoretically 16 exabytes or 17.2 billion gigabytes is the limit. however the operating system(in this case windows) will limit your amount of RAM as follows.
- Windows 8 Enterprise 512 GB
- Windows 8 Professional 512 GB
- Windows 8 128 GB
- Windows 7 Ultimate 192 GB
- Windows 7 Enterprise 192 GB
- Windows 7 Professional 192 GB
- Windows 7 Home Premium 16 GB
- Windows 7 Home Basic 8 GB
Suppose you have a computer with 16 GB of memory. If the computer is usually using about 4 GB of memory and never reaches 8 GB. You may end up asking would the computer run as equally fast by removing half of the 16 GB and working with only 8 GB or memory.
The quick and dirty answer is no, because the operating system can use the extra RAM as disk cache, which speeds up access to data on the disk. Extra RAM will not make CPU-bound computations (not involving much disk I/O) faster though.
The more precise answer is as follows:
Below is an example from a computer with 24 GB of RAM. Even though only 7 GB is currently allocated as “In Use” memory, another 10 GB is allocated as “Standby” memory and contains data that may or may not be read again. If it is read, it will make your computer faster. The “Free” memory is not being utilized whatsoever at the moment.

Hardware Reserved
Beginning on the left, in gray, is the Hardware Reserved list, which shows the amount of memory reserved for hardware. This list represents the amount of memory that the various hardware devices installed in your system have reserved so that they can communicate with the operating system. Of course, memory reserved for hardware is essentially locked and as such is not available to the memory manager.
Typically, the amount of Hardware Reserved memory ranges from 10MB to 70MB but can vary depending on the system’s hardware configuration and might be several hundred MB. Examples of components that can affect the amount of memory reserved include:
- System BIOS
- Motherboard resources, such as I/O advanced programmable interrupt controller (APIC)
- Sound cards or any other devices that require memory-mapped I/O
- PCI Express (PCIe) bus
- Video card
- Various chipsets
- Flash devices
In Use
The In Use list, shown in green in Figure C, represents the amount of memory being used by the operating system, drivers, and the various running processes. In Use memory is calculated by adding the sizes of the Modified, Standby, and Free values and subtracting this from the amount of recognized memory, which is listed as Total in the section just below the graph. The Total memory is calculated by subtracting any Hardware Reserved memory from the Installed RAM.
Modified
Shown in orange, the Modified list represents the pages of memory that contain data that has been modified but not been accessed for a while. As such it is not technically in use but can still be pulled into service quickly if needed. If memory in the Modified list has not been accessed in a long time, the memory manager will write the page to disk and then move it to the Standby list.
Standby
The Standby list, which is shown in blue, contains pages that have been removed from process working sets but are still linked to their respective working sets. As such, Standby list is essentially a cache. However, memory pages in the Standby list are prioritized in a range of 0-7, with 7 being the highest. Essentially, a page related to a high-priority process will receive a high-priority level in the Standby list.
For example, processes that are Shareable will be a high priority and pages associated with these Shareable processes will have the highest priority in the Standby list.
Now, if a process needs a page that is associated with the process and that page is now in the Standby list, the memory manager immediately returns the page to that process’ working set. However, all pages on the Standby list are available for memory allocation requests from any process. When a process requests additional memory and there is not enough memory in the Free list, the memory manager checks the page’s priority and will take a page with a low priority from the Standby list, initialize it, and allocate it to that process.
Free
The Free list, shown in light blue, contains pages of memory that have not yet been allocated to a process or were previously allocated but returned to the memory manager when the process ended. (While “not yet been allocated” and “previously allocated” memory both show in the Free part of this bar graph, the “not yet been allocated” pages are actually part of another list called the Zero Page list. These are so-called because they have been initialized to zero and are ready for use when the memory manager needs a new page.)
July 7, 2014
iambiebs | Make A Comment | nerdisms, Tech
Ask a geek how to fix a problem you’ve having with your Windows computer and they’ll likely ask “Have you tried turning it off and on again?” This seems like a flippant response, but rebooting a computer can actually solve many problems.
So what’s going on here? Why does resetting a device or restarting a program fix so many problems? And why don’t geeks try to identify and fix problems rather than use the blunt hammer of “reset it”?
This Isn’t Just About Windows
Bear in mind that this soltion isn’t just limited to Windows computers, but applies to all types of computing devices. You’ll find the advice “try resetting it” applied to wireless routers, iPads, Android phones, and more. This same advice even applies to software — is Firefox acting slow and consuming a lot of memory? Try closing it and reopening it!
Some Problems Require a Restart
To illustrate why rebooting can fix so many problems, let’s take a look at the ultimate software problem a Windows computer can face: Windows halts, showing a blue screen of death. The blue screen was caused by a low-level error, likely a problem with a hardware driver or a hardware malfunction. Windows reaches a state where it doesn’t know how to recover, so it halts, shows a blue-screen of death, gathers information about the problem, and automatically restarts the computer for you . This restart fixes the blue screen of death.
Windows has gotten better at dealing with errors — for example, if your graphics driver crashes, Windows XP would have frozen. In Windows Vista and newer versions of Windows, the Windows desktop will lose its fancy graphical effects for a few moments before regaining them. Behind the scenes, Windows is restarting the malfunctioning graphics driver.
But why doesn’t Windows simply fix the problem rather than restarting the driver or the computer itself? Well, because it can’t — the code has encountered a problem and stopped working completely, so there’s no way for it to continue. By restarting, the code can start from square one and hopefully it won’t encounter the same problem again.
Examples of Restarting Fixing Problems
While certain problems require a complete restart because the operating system or a hardware driver has stopped working, not every problem does. Some problems may be fixable without a restart, though a restart may be the easiest option.
Windows is Slow: Let’s say Windows is running very slowly. It’s possible that a misbehaving program is using 99% CPU and draining the computer’s resources. One could head to the task manager and look around, hoping to locate the misbehaving process an end it. If an average user encountered this same problem, they could simply reboot their computer to fix it rather than dig through their running processes.
Firefox or Another Program is Using Too Much Memory: In the past, Firefox has been the poster child for memory leaks on average PCs. Over time, Firefox would often consume more and more memory, getting larger and larger and slowing down. Closing Firefox will cause it to relinquish all of its memory. When it starts again, it will start from a clean state without any leaked memory. This doesn’t just apply to Firefox, but applies to any software with memory leaks.
Internet or Wi-Fi Network Problems: If you have a problem with your Wi-Fi or Internet connection, the software on your router or modem may have encountered a problem. Resetting the router — just by unplugging it from its power socket and then plugging it back in — is a common solution for connection problems.
In all cases, a restart wipes away the current state of the software. Any code that’s stuck in a misbehaving state will be swept away, too. When you restart, the computer or device will bring the system up from scratch, restarting all the software from square one so it will work just as well as it was working before.
Ultimately, the answer is that “resetting a computer wipes away the current state of the software, including any problems that have developed, and allows it to start over from square one.” It’s easier and faster to start from a clean state than identify and fix any problems that may be occurring — in fact, in some cases, it may be impossible to fix problems without beginning from that clean state.
May 22, 2014
iambiebs | 1 Comment | nerdisms, Tech
Everybody always tells you to make sure that you are backing up your PC, but what does that really mean? And what files do you actually need to backup? Today I will walk you through the basics of backing up your PC, what you should back up, and why.
Of course, these rules won’t fit every scenario, so you’ll need to use a little common sense—think about what is most important to you on your PC, and make sure that you’ve figured out how to backup those files.
The All-Important Rule of Backups
The primary principle of backing up your data is that any important data should exist in two or more physical locations at once. You cannot create a backup and delete the original, or else it is no longer really a backup.
You might think this is obvious, but you’d be surprised how often I’ve been approached by others that lost their data after their “backup” drive died.
What Should You Use for Backing Up Your PC?

There are lots of different applications that you can use to make backups of your files, and there’s even one built into Windows… It doesn’t matter which tool you use as long as it does a decent job of creating backups.
Local Backups
It’s important to create local backups to an external drive or another PC for speed of restoring files should something bad happen, and also because this is going to be the quickest way to create backups.
Online Backups
There are a number of paid online backup services like Mozy, Carbonite, Spideroak, andJungledisk, and there are also some file sync services like Dropbox and SugarSync that provide backup type of capability. These are all excellent secondary backup services, but probably shouldn’t replace a regular backup just because they will take a long time to restore.
Note: if you’re looking for a great way to keep a folder in sync between PCs and accessible from anywhere, Box or dropbox. Otherwise, you should probably check out Mozy, since it has a unique ability to create local backups as well as online backups.
System Image Backups
Rather than simply backing up files, you can create a complete backup of your system that can be restored over top of your system. The only problem with creating these type of backups is that they require a real lot of drive space. The best bet is to create an image when your system is up and running and everything is installed, and then you can use it to more easily restore everything rather than reinstalling everything manually.
You can use a freeware application called DriveImageXML. If you’re looking for a paid solution that works really well, you can check out Acronis.
What Files Should You Backup?

The most important files to backup are probably your documents, pictures, music, and other user files, but they are not the only files that you need to backup. Let’s walk through some of them.
-
Documents: You should backup your entire documents folder all the time. This should be a no-brainer.
-
Music: If you’ve paid lots of money for MP3 downloads, you’ll probably be sad to lose them. Make sure to include this folder. Note: if you’re an iTunes user, you should make sure to backup your iTunes folder, which is thankfully usually inside this directory.
-
Pictures & Videos: It’s really sad when I get emails from people saying their hard drive died and they lost all their pictures of their family. The photos might not have actually costed you anything, but you’ll probably be more sad about losing memories than paying for music downloads again.
-
Desktop Email: If you’re using Outlook or Windows Live Mail, make absolutely certain that you’ve backed up the files from these applications. Outlook stores all your email in a .PST file.
-
Application Settings: If you look within the AppData folders, you’ll see directories for each and every application you’re running. These settings can often be restored from a backup so you don’t have to tweak everything again. Just head into C:\Users\Username\AppData\ to see the Local, Roaming, and LocalLow folders that contain many settings for your applications.

-
Virtual Machines: If you use virtual machines for real work, you should probably create a backup of your virtual machines at some point. I wouldn’t necessarily recommend backing these up every single night, but you should at least consider some type of backup plan.
-
Bookmarks: Most browsers other than Internet Explorer actually make it difficult to backup your bookmarks using Windows Backup, but the much better option is to sync your bookmarks to the cloud.
Backup These Files More Easily
Instead of trying to find all those locations, backup your entire Users folder, which is at C:\Users\Username in Windows 7 or 8. This will include all of those files, unless you’ve stored them somewhere else.
Files You Should Not Bother Backing Up

There’s simply no reason to backup these directories:
-
Windows: There’s almost never a reason to backup your Windows directory, as you’re going to have to reinstall the whole thing anyway, so this backup will likely do you no good.
-
Program Files: You’re going to have to reinstall your applications if your computer dies and you have to reinstall. Why bother backing up all these files?
It’s worth noting that if you create a system image backup, you won’t have to reinstall all of your applications, and backing up these folders would still be pointless.
When should you backup?
The best bet is to backup your files on a fairly regular basis–daily if possible. If you’re using an online backup solution, they are often configured to immediately start syncing any changed files when your PC is idle for a little while. This can be a great way to keep your files safe without having to wait for the next backup.
Hopefully these tips will help you backup your files and keep you protected.
Don’t forget the most important rule: any important data should exist in two or more physical locations at once.
May 22, 2014
iambiebs | Make A Comment | nerdisms, Tech
Backups on Windows can be confusing. Whether you’re using Windows 7 or 8, you have quite a few integrated backup tools to think about. Windows 8 made quite a few changes, too. You can also use third-party backup software, whether you want to back up to an external drive or back up your files to online storage. Windows 7 has its own Backup and Restore feature that lets you create backups manually or on a schedule. You’ll find it under Backup and Restore in the Control Panel. The original version of Windows 8 still contained this tool, and named it Windows 7 File Recovery. This allowed former Windows 7 users to restore files from those old Windows 7 backups or keep using the familiar backup tool for a little while. Windows 7 File Recovery was removed in Windows 8.1.

System Restore on both Windows 7 and 8 functions as a sort of automatic system backup feature. It creates backup copies of important system and program files on a schedule or when you perform certain tasks, such as installing a hardware driver. If system files become corrupted or your computer’s software becomes unstable, you can use System Restore to restore your system and program files from a System Restore point.
This isn’t a way to back up your personal files. It’s more of a troubleshooting feature that uses backups to restore your system to its previous working state.

Windows 7′s Previous Versions feature allows you to restore older versions of files — or deleted files. These files can come from backups created with Windows 7′s Backup and Restore feature, but they can also come from System Restore points. When Windows 7 creates a System Restore point, it will sometimes contain your personal files. Previous Versions allows you to extract these personal files from restore points.
This only applies to Windows 7. On Windows 8, System Restore won’t create backup copies of your personal files. The Previous Versions feature was removed on Windows 8.

Windows 8 replaced Windows 7′s backup tools with File History, although this feature isn’t enabled by default. File History is designed to be a simple, easy way to create backups of your data files on an external drive or network location.
File History replaces both Windows 7′s Backup and Previous Versions features. Windows System Restore won’t create copies of personal files on Windows 8. This means you can’t actually recover older versions of files until you enable File History yourself — it isn’t enabled by default.

Windows also allows you to create system image backups. These are backup images of your entire operating system, including your system files, installed programs, and personal files. This feature was included in both Windows 7 and Windows 8, but it was hidden in the preview versions of Windows 8.1. After many user complaints, it was restored and is still available in the final version of Windows 8.1 — click System Image Backup on the File History Control Panel.

Windows 8′s Storage Spaces feature allows you to set up RAID-like features in software. For example, you can use Storage Space to set up two hard disks of the same size in a mirroring configuration. They’ll appear as a single drive in Windows. When you write to this virtual drive, the files will be saved to both physical drives. If one drive fails, your files will still be available on the other drive.
This isn’t a good long-term backup solution, but it is a way of ensuring you won’t lose important files if a single drive fails.

Windows 8 and 8.1 allow you to back up a variety of system settings — including personalization, desktop, and input settings. If you’re signing in with a Microsoft account, OneDrive settings backup is enabled automatically. This feature can be controlled under OneDrive > Sync settings in the PC settings app.
This feature only backs up a few settings. It’s really more of a way to sync settings between devices.

Microsoft hasn’t been talking much about File History since Windows 8 was released. That’s because they want people to use OneDrive instead.
OneDrive — formerly known as SkyDrive — was added to the Windows desktop in Windows 8.1. Save your files here and they’ll be stored online tied to your Microsoft account. You can then sign in on any other computer, smartphone, tablet, or even via the web and access your files. Microsoft wants typical PC users “backing up” their files with OneDrive so they’ll be available on any device.

You don’t have to worry about all these features. Just choose a backup strategy to ensure your files are safe if your computer’s hard disk fails you. Whether it’s an integrated backup tool or a third-party backup application, be sure to back up your files.
April 9, 2014
iambiebs | 1 Comment | nerdisms, Tech

In the last few years, there has been a surge of renewed interest in using Linux, in both the server and desktop spaces. Several factors are contributing to this surge, all happening at once. First, there is the trend from powerful desktops to smaller, but less powerful, devices. In addition, more user (and media) friendly Linux distributions such as Ubuntu or Linux Mint have hit the scene.
Linux is a highly developed, stable and advanced operating system – this, I will never question. It comes in every conceivable flavor – from server solutions to desktop releases with more software than anyone could possibly ever need. Largely, however, Linux has still been found wanting. Whether because of some inherent weakness of Linux, a preconceived advantage that doesn’t pan out, or the fact that users simply miss their familiar Windows functions, there are a number of reasons why Linux isn’t triumphing over Windows.
On the server side, Linux is kicking ass and taking names. Recent reports claim that Amazon alone is using as many as half a million Linux servers in data centers around the world to power its cloud services—a strong indicator of just how established Linux is. but on the desktop side of the fence Linux is a non-issue. Compared to Microsoft Windows, even Mac OS X has trivial desktop market share, but it’s enough to put it on the radar, and Mac OS X has been growing strong in recent years. Linux, on the other hand, has never really been more than a rounding error
Familiarity
Let’s face it: Whatever else you might say about Windows, it is easier to use. We love our Start menu and our Task Manager and our system tray. Some of us started to love the Windows Sidebar and gadgets, before they were taken away. Young adults today never had to use MS-DOS, even if they started using computers at an early age, so they aren’t going to be comfortable at a Linux command line.
Don’t get me wrong — Linux has come a long way. But remember how far back it has had to come from — where just managing to install the operating system for a non-expert (and sometimes experts too) was considered a major triumph. There are still too many things in the Linux world that are expected to be done manually, like program installation. A majority of users will say, “I might have to compile something myself? No thanks.”
There’s a reason IE is still a huge part of the browser market: people are scared of “breaking their computer”. Most people can’t fix computer problems themselves, and everyone knows that support these days consists of either “This isn’t our problem, it’s a problem with [insert application here]”, or “reformat and reinstall”. Sure, give someone Firefox and they generally like it more than IE, but most people will use IE because it’s what they’re used to.
Software
Free open source software isn’t a bad thing, but sometimes it’s worth paying for a quality product. Take GIMP for example, which after experiencing it, you’re either going to love or hate. If you hate GIMP, be it the workflow, interface or just general shortcomings in comparison with Photoshop then you’ve not got much in the way of alternatives.
GIMP is about as good as it gets on Linux when it comes to imaging software, and even compared to the Windows-only solution Paint.NET it can feel outdated, messy and not particularly intuitive to the Adobe generation. There’s no Adobe line-up for Linux despite the community’s many pleas (Flash support is pretty horrendous at times too).
If you’re a musician used to Traktor, Cubase, Reason, FLStudio (I could go on) or even Garage Band then you’re out of luck there too. There are a few decent solutions, but there’s a reason most music is produced on a Mac or Windows machine.
Serious video editing is a no-go too. Despite the many capable solutions out there that are built for Linux, there’s still nothing that compares to industry standards like Final Cut Pro or Adobe Premier. Of course these are expensive software suites I’m mentioning, but they’re also widely used and bought for a reason. Linux software simply can’t compare when it comes to this level of professional software
Now of course much of our favorite Windows software can be run using an emulator such as Wine, or on a virtual machine running Windows — but if we find ourselves doing that all the time, why use Linux in the first place?
Community
Linux advocates will tell anyone who listens that any Linux problem can be solved easily by the oh-so-supportive community of users. However, not everyone has access to either a second computer at home, or a work computer where they can spend idle time interacting with the community to find answers. It’s kind of hard to look up the answer online when your computer can’t connect to your wireless network. One can spend hours researching an issue with Linux and you do not dare start a new topic anywhere. Linux does have loyal, knowledgeable users willing to help guide you through the murky waters. Of course, it’s often difficult to find them through the sea of self-righteous flamers who berate you for not knowing what you’re doing.
People do not Like Change. Oh do they not like change. With Windows 8 change happened significantly mostly with the start menu and how programs were launched. This change was enough for people to write it off completely without actually just sitting down and just using it for a moment. Microsoft wanted to move into the mobile network and so they designed their OS to compete in the market and I think they did an okay job at doing it though it had a rough start, remember vista’s start?
What do we do?
I know there’s an army of dedicated Linux hobbyists who will no doubt unleash a barrage of flames and tirades. They’ll tell you all the ways Windows sucks, and all the reasons Apple is evil (Many know I hate Apple as a company, however, their hardware/software is fine. Even if it is overpriced), and make exalted claims about how wonderful their lives are since they made the switch, and how they’ll never go back (sounds familiar huh?).
Let me preemptively say, “That’s great. I’m happy for you.” It doesn’t change the fact that you’re part of a negligible market segment. It doesn’t change the reality that Linux is not as intuitive or user friendly as its rivals, or that it lacks the third-party hardware and software support of its rivals, or that using it requires a learning curve and the dedication to dive into forums and learn to tinker. It’s great for hobbyists and hackers, but not for an average user at a company.
March 20, 2014
iambiebs | Make A Comment | nerdisms, Tech
Imagine your home goes up in flames and all those memories and important moments are suddenly gone. You may mourn the loss of your house’s actual physical structure, but it’s the stuff that was inside of it that really mattered.
Similarly, if your computer gets hosed or stolen, you will definitely feel the sting of not having your computer for a certain term, i.e. until you can replace it, but what’s really going to sting and continue to haunt you for long after will be all those personal files you lost.
Of course, it doesn’t have to be this way. There are really simple ways to easily backup your data quickly and painlessly, often with little to zero interaction from you (once you set everything up). These solutions range from full system to incremental backups, using a variety of mediums. Out of all the things you put into your computer, no matter how expensive the components, peripherals, and accessories, you cannot put a price on your data. The time you put into your documents, photos, music collection, and everything else is invaluable and irreplaceable.
Different backup mediums, pros and cons
The type of medium you back your stuff up to will depend largely upon your means, what you’re protecting, and how much you want to spend. Some storage mediums are clearly better than others so it’s important you spend a little time considering all your options.
Hard drive
Hard drives remain the cheapest and most generous backup option. Today you can easily buy a 1 terabyte external hard drive for under $100 and that is usually way more than enough to back up all your files and entire system. Of course, if you have even more data to protect, larger hard drive sizes are also very affordable.
The downside to hard drives is that they’re still doomed to fail at some point in the future. They’re also comparatively slow and consume more power than thumbdrives or SSDs.
Flash drives and SSDs
Flash drives and their hard drive brethren SSDs are the most efficient and fastest way to do backups. The ability of flash to provide very fast write and read speeds, means that you can use them to quickly archive your data.
That said, it’s hard to imagine flash technology as a good long-term storage medium. In most cases, such as with thumb drives and SD cards, the purpose is to simply carry files from one place to another, while SSDs are better intended as system or gaming drives owning to their performance rather than longevity.
And while the cost of SSDs has fallen greatly in recent years, they still pale in comparison to HDDs in terms of price and capacity.
CD-ROM and DVD-ROM
Most readers should be intimately familiar with storing files on CD/DVD. Obviously, both are limited in size, a CD has a 700 MB capacity, while a DVD is usually 4.7 GB or 8.5 GB.
I will be completely blunt about this, CDs and DVDs are a dying medium. Most of the laptops, particularly ultrabooks, produced today are eschewing optical drives, and it’s just easier and cheaper at this point to leave an optical drive out of the mix when building a new computer.
Moreover, a lot of software is only distributed online, OS X for example, and even Microsoft is moving more and more towards the Internet to distribute Windows.
Finally, recordable CDs and DVDs simply don’t last – think years not decades – so if you are going to use optical media to archive your files, keep the following tips in mind:
-
Use high quality, “archival quality” discs
-
Use a jewel box instead of a paper sleeve to store them
-
Keep your discs clean, hold them by the edges and wipe fingerprints off with clean, soft cloth
-
Store them in a dark, dry, cool place
-
Mark your discs with a non-solvent based felt-tip marker
-
Write discs at a slow speeds to better ensure write integrity and minimize rewrites
If you really must use optical media for your backups, you should take precautions to preserve them.
Cloud storage
Cloud storage is such a new trend that a lot of people still don’t immediately consider it, but it is quickly becoming a de-facto place to back up stuff. The great thing about cloud storage is that as long as you have an Internet connection, it’s always on and present so it’s especially good for incremental backups.
There are a few obvious drawbacks to cloud storage. For one, you have to have to be connected for it to work, otherwise you’re just saving everything locally. Also, meaningful cloud storage space (more than what is typically offered for free), is a recurring cost versus buying an external hard drive once. Finally, unless you’re connected to the Internet via a fat data pipe, like fiber, uploading is a pain, especially if you have gigabytes of stuff to back up, were talking days to upload everything.
Your best bet for backups is a combination of external hard drive(s) for archiving purposes, and cloud storage for incremental stuff.
That said, the single coolest feature of cloud storage is the fact that if you store your documents or pictures from one location, wherever you go, to whatever computer or device, if you have an Internet connection, your stuff is always there.
Using the myriad cloud services out there is an effective way to keep your stuff constantly backed up but if you have meaningful amounts of data then you will obviously need lots of space. That means paying for it since most of the freely allotted space is only a fraction of what you’d want.
Cloud Service Comparison
Here’s a quick comparison chart of some of the more popular cloud services out there. Keep in mind that today basically everyone has some kind of cloud storage service so there’s a lot more than appears here.
| Service |
Free space |
Upgrade pricing |
Compatibility |
| Amazon Cloud Drive |
5 GB |
Pricing starts at $10/year for 20 GB and tops out at 1000 GB for $500/year |
Kindle Fire, Android, iOS, Windows, Mac |
| Apple iCloud |
5 GB |
10 GB – $20/year, 20 GB – $40/year, 50 GB – $100/year |
iOS, Mac, Windows |
| Box |
10 GB |
Pricing starts at $5 per user per month for up to 100 GB and can top out at $35 per user per month for unlimited storage. |
Android, iOS, Windows |
| Carbonite |
None |
Carbonite markets itself as a complete backup solution. Pricing starts at $59.99 per year per computer for unlimited storage. |
Windows and Mac |
| Dropbox |
2 GB |
Dropbox offers incentives to gain more free space.Upgrade pricing starts at 100 GB – $8.25/month, 200 GB – $16.60/month, 500 GB – $41.60/month. All plans are billed annually. |
Windows, Mac, Linux, Android, iOS, Blackberry, Kindle Fire |
| Google Drive |
15 GB |
Drive’s space is shared with Gmail and Google +. Upgrade pricing starts at 100 GB – $4.99/month and 200 GB – $9.99/month |
Windows, Mac, Android, iOS |
| OneDrive |
7 GB |
Pricing starts at 50 GB – $25/year, 100 GB – $50/year, 200 GB – $100/year |
Windows, Windows Phone, Mac, iOS, Android |
| Mozy |
2 GB |
You can get more free space by referring friends. Upgrade pricing starts at 50 GB – $5.99/month and 125 GB – $9.99/month. You can add an additional 20 GB for $2/month and additional computers for $2 per month per computer. |
Windows, Mac, iOS, Android |
| Sugarsync |
Plans are free to try for 30 days. |
Pricing begins at 60 GB – $7.49/month or $74.99/year, 100 GB – $9.99/month or $99.99/year, 250 GB – $24.99/month or $249.99/year, 1000 GB – $55/month or $550/year. Alternatively, Sugarsync will let you develop a custom tailored plan. |
Windows, Mac, iOS, Android |
Using your back up to target specific data stores
In Windows, there’s a couple of data stores that you can safely focus on backing up, which will better ensure all your essential personal data is safe, namely “Libraries” and “Special Folders”. Libraries are basically collections of stores and you can add to them to consolidate your various data types: Documents, Music, Video, Pictures, and Downloads.

So, one way to quickly backup your music files for instance, would be to add your music folders and/or drives to the “Music” library. Then all your music is one place. Rather than having to add your music location(s) in your backups, you can simply add the library such as with our “Documents” library in the screenshot.

Here then, if you have several folders that fall under the documents category, they’re all in one designated repository.
On the other hand, while you may have all your documents consolidated in the “Documents” library, you may only want to back up the designated system folder.
Special folders
Many Windows users are familiar with their documents folder, and they know that their photos are automatically saved in the “Pictures” folder in the user folder, while videos default to the “Videos” folder, etc.
One of the cool things you can do with special folders is move them to your cloud service. This helps you create seamless roaming folders such that, when you redirect your “Documents” or “Music” folders to a cloud drive, you can quickly sync your data on every Microsoft profile you log into, simply navigate to your user folder, and move your special folders.
Let’s briefly demonstrate how you’d do this with Dropbox, Google Drive, and Microsoft OneDrive (formerly SkyDrive).
Moving Special Folders
So the idea here is that we’re going to take one of our special folders, in this case the “Desktop” and move it to a cloud folder, which means that it will be synchronized to the cloud every time we make a change to it. This not only backs up the special folder continuously, but you can also move your special folders to a cloud folder for seamless synchronization across all your connected Windows devices.
The following instructions are for Dropbox, however, the same instructions apply to the other cloud services too. In fact, all these cloud services install special folders in your user folder so you can also relocate them to a larger hard drive, if necessary.
To move a special folder you can either navigate to your user folder, for example, C:\Users\Matt, or you can simply right-click and select properties for many of the system’s special folders in “File Explorer”.

In the “Properties” dialog, click “Move” to relocate the folder to another location.

In the “Select Destination” window, navigate to the location where you want to move the folder and then choose “Select Folder”.
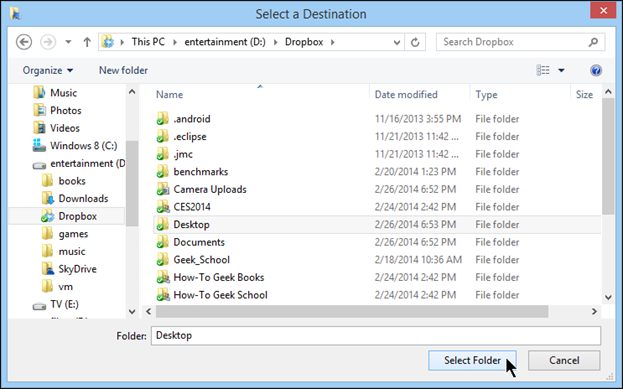
A warning dialog will appear asking you if you’re positively sure you want to move all the files from the old location to the new one. Click “Yes” to continue.

Data in the older folder will then be transferred to the new location. Note, if you want to move that particular special folder again, you will need to choose it from its new location or “File Explorer”, if applicable.
Backup Tools
There are two ways to back stuff up, archival and incremental. In Windows, this can be accomplished either through “System Image” backups or “File History”, respectively.
File History
“File History” was introduced in Windows 8 so it is not available for other Windows versions. The concept of “File History” should be very familiar to anyone who has paid attention to Apple’s “Time Machine” for OS X. “File History” like “Time Machine” works by creating incremental backups.
This means that at regular intervals, be they ten minutes, an hour, a week, etc., your libraries, desktop, contacts, and favorites are backed up to another drive or partition. The difference however, between simply backing things traditionally where you typically overwrite the old backup with the new one and in the case of “File History”, is that backups are saved as versions.
This means that “File History” will save every version of a file or folder structure, and any changes that take place, at the preset interval. So, if you suddenly realize that you need made changes to a source file instead of making a new copy, you can go back and retrieve that file as if it never happened.
Selecting a drive and turning file history on
“File History” is super easy to start and configure, either from the Control Panel or “PC settings”. Before you actually turn “File History” on, it is a good idea to make sure you have chosen your backup drive.
To choose a backup drive, click “Select Drive” and choose a backup drive from the “Select a File History drive” screen.

Once you’ve selected a backup drive you can turn on “File History” and it will automatically start backing up your libraries, desktop, contacts, and favorites and will continue to do so until the backup drive’s allocated space is used up, or the drive runs out of space, thereafter the oldest backups will be automatically deleted to make way for the new backups.
Excluding Folders
If you want to back up everything “File History” does by default, then you can safely leave it to its own devices. However, if you want to keep your backups small, or the sum total of your libraries exceed your available disk space, you can exclude folders.
Simply click “Exclude Folders” and on the “Exclude from File History” screen and click “Add” and choose the items you want to exclude.

Note, “File History” only backs up your Libraries (Music, Pictures, Videos, Documents, Downloads), Contacts, Desktop, and Favorites. If you want to include other files and folders in “File History”, you will first need to add them to your Libraries (detailed earlier).
Restore personal files
Should the time come when you need to retrieve a previous file or folder version, click “Restore personal files” and the file restore screen will appear. You can “rewind” and “forward” through your backups and then click the green restore button when you find the item(s) you want to restore.

Advanced settings
Finally, the “Advanced Settings” allow you to choose the frequency “File History” creates backups, and how long it keeps saved versions. You can also set the size of your offline cache, and decide how it keeps saved versions.

System Images
When you create a system image, you are taking everything that is on a drive or partition and copying it to a backup medium. Because of the way images work, when you restore one, your computer will restart and the backed up system will overwrite your current installation. When your computer reboots, your computer will be restored to the same state you imaged it to.
Therefore, before making any backup images, make sure you’ve fully updated your system and you’ve installed any main apps you normally use. This ensures your recovery time is minimized if you do ever have to reinstall the system image.
Creating a System Image
To open the “System Image” wizard in Windows 8.x, you can click the link from the “File History” screen.

In Windows 7, you can open “Backup and Restore” from the Control Panel.

If you want to “Create a System Image”, click the appropriate link.

Note, the Windows 7 “Backup” section, and specifically the “Set up backup” link. Clicking this link will trigger the old style “Windows Backup”, which no longer comes installed on Windows 8.x. You can use “Windows Backup” to back up your whole drive or just certain parts.
Since Windows 7 doesn’t come with “File History”, you can use “Windows Backup” for incremental backups, though it won’t be as simple or convenient.

Creating a system image on either Windows 7 or Windows 8.x is virtually the same so I’ll continue this discussion showing the Windows 8.x version. When the wizard first opens, you can choose to save it to a hard disk, one or more DVDs, or a network location.
After selecting your backup destination, click “Next” to move the proceeding screen.

Here, you will need to choose the source drive or partition. Note you can choose one or more sources to back up.

The next screen will ask you to “confirm your backup settings”. It will tell you approximately how much disk space it will take up, and that any existing system images could be overwritten. Click “Start backup” and your backup will begin.

Restoring a System Image
Restoring a system image is easy. In Windows 7, simply open the Control Panel and type “Recovery” in the search box. Then choose “Recovery”.

Then, choose “Advanced recovery methods” below the “System Restore” option.

Finally, choose “Use a system image you created earlier to recover your computer” to begin the recovery process.

In Windows 8.x, use the Metro “PC settings” and choose “Update and recovery” and then “Recovery” and then click “Restart now” under “Advanced startup”. When the computer restarts, you will be shown a blue “Choose an option” screen.
Click “Troubleshoot” to continue.

On the “Troubleshoot” screen, choose “Advanced options”.

Finally, on the “Advanced options” screen, choose “System image recovery” to begin the process.

And that’s it, your computer will be restored and everything will be back in place as you left it!
March 14, 2014
iambiebs | Make A Comment | nerdisms, Tech
Today I am going to talk about improving your PC’s performance beyond the basic steps I’ve already covered thus far. Chances are your computer runs perfectly well until you start stressing it and then it will obviously slow down as it is given more demands.
Yet, there’s still those times when your system just bogs down and doesn’t seem like it wants to budge – like it’s stuck in mud and switching between apps seems to take an age. If your system feels slower, then it most likely is.
Many performance problems can simply be tracked down to too much overhead and too few resources. In other words, your computer can only handle so many simultaneously running processes before it starts to show signs of strain. This may manifest as long load or boot times, or applications may hang or stall, or the computer may exhibit signs of instability such as blue screens or sudden restarts.
This is the practical advice lesson and it will be here that I talk about improving your diagnostic skills with the all-powerful “Task Manager”, which is far more useful than its simple name would imply.
Before I do that however, I am going to delve into something very important, which is very often neglected by a vast number of PC users: updates.
Keeping Things Properly Updated
If your system isn’t regularly updated, it could be compromised and open to attack from hackers. Microsoft regularly issues patches and security updates and if your system isn’t set to download and automatically install them, or you’re not super diligent about checking for, downloading, and installing these updates, then you put your system at risk.
Perhaps even more important however, are those other little programs that don’t always get star treatment: Oracle Java, Adobe Flash, and Adobe Reader. While I did cover these plugins in the previous post, I want to stress again how important it is that these types of programs, any program really, are kept up-to-date.
Windows update
Windows provides a utility, aptly named “Windows Update” that allows you to keep your system patched and secure (to an extent) from any malicious attempts to gain access and seize control of your computer.
When you first create a master or administrator account on a new Windows install, you will asked whether you want updates to download and install automatically, or if you want to do this manually. I highly recommend you allow Windows to take care of updating itself.
Nevertheless, if you think you want to handle this portion of PC maintenance, then you need to know how to use “Windows Update” so you never miss a critical update.
To open “Windows Update” you will need to open the Control Panel. This is true whether you’re on Windows 8.x or Windows 7. In Windows 8.x, you can also update your system via the “PC settings” in the Metro interface under “update and recovery”.

For the sake of consistency, let’s stick to the desktop version. Once you’re familiar with that, the Metro version is pretty much the same thing.
When you first open “Windows Update” you will see its status, such as whether “you’re set to automatically install updates”. In the following screenshot, you see I have 3 optional updates available, but I also initiated a manual “check for updates” and you see I have 1 important update too.

You can click on the links to see what these updates are. You should install whatever important updates are available but you can be a bit pickier about optional updates.

In fact, you can even right-click on an update and hide it, so it no longer shows up in “Windows Update”.

Worry not, if you find you really need the “Bing Bar” or “Bing Desktop” or some other hidden update, you can use the “restore hidden updates” function.

All-in-all, “Windows Update” is a cinch to use, so if you decide to attend to your own updates, it’s usually a matter of remembering to install them. Luckily, you can set the level at which important updates occur with “Change settings”.
“Windows Update” not only handles important updates, but recommended updates, and updates for other Microsoft products like Office. You can disable these latter two if you don’t want to receive them through “Windows Update”.

With regard to “Important updates”, you choose between one of four different configurations giving you the full array of control over your updating process. You honestly don’t want to turn off automatic updating completely, but you can choose whether it notifies you that updates exist and then give you the choice whether to download and install them, or download them and then install them.

Note at the bottom of the important updates section there’s a link “updates will be automatically installed during the maintenance window.” Click on this and you will be able to decide when Windows Update runs. By default, it’s set to run daily at 3 AM and will wake up your computer, if necessary.
If you don’t want “Automatic Maintenance” waking up your computer at 3 AM, either uncheck the box next to “Allow scheduled maintenance to wake up my computer …” or change the time to when you know the computer will be on.

Java, Flash, and Reader
While Java, Flash, and Reader only represent a small drop in the bucket when it comes to applications, they’re often the most common entry points for many types of malware, especially Java, which is said to be responsible for HALF of all security exploits.
Oracle’s Java is everywhere. Some people recommend not installing java if you don’t need to an extent I agree. You may be able to do 99 out of 100 things on your computer but there’s always that one that requires Java. I play Minecraft and that requires Java to run. Just like everything else you still have to give java permission to run. There is a box that will pop up asking if you started the application. This doesn’t stop someone from hiding harmful code in a legitimate software and that can happen to any application.
Java comes with an “Update Scheduler” that automatically runs at regular intervals thus checking for, downloading, and installing updates. You can see it here in our “Startup” tab on the “Task Manager”.

Updating Java manually is a cinch. Simply open your “Start” menu (it will be in “All Program” in Windows 7) and click “check for updates” in the Java menu.

Alternatively, you can simply open the “Java (32-bit)” control panel from the Control Panel.

Once open, select the “Update” tab to see your available update options. In the following example, the updater is set to notify the user before downloading any updates. This can be changed to automatically download updates, and to then notify us before installing.

If you want to turn off automatic updates (highly not recommend), then uncheck the box next to “Check for Updates Automatically”.
What is recommend is clicking the “Advanced” button and altering your update schedule. In the following screenshot, you see that Java is set to check for updates every month on Monday at 5 AM. It seems unlikely, no matter how bad a Monday it is, that you’ll be up at 5 AM so you can change this to something else, possibly more frequently, at a more productive time of day.

Finally, to execute a manual update, click the “Update Now” button at the bottom of the Java Control Panel.

If there are updates available, it will prompt you to update. If there aren’t, then you’re good to go (for now).

Adobe Flash
Adobe Flash Player is arguably the most widely used browser plugin out there. So much so that it is largely indispensable, which makes it a very attractive target for exploits. I described how to manage extensions and plugins in the previous post so I am not going to dwell further on that.
For the most part, browsers, particularly Google Chrome (which I recommend) are pretty good about automatically updating plugins.

That said, if want to download the “Adobe Flash Player system plug-in” (for use with other programs such as video processing) then you will be presented with the following options.

There’s really not a lot to think about here, you should most definitely “Allow Adobe to install updates”. Once installed, you can administer to the system Flash Player from the Control Panel.

The Flash Player control panel is similar to the Java control panel only the update settings are on the “Advanced” tab. Click the “Change Update Settings” button and you will be able choose one of the other two options. Note, you must have administrator rights to do this.

To execute a manual update check, click the “Check Now” button. You will be whisked to Adobe’s Flash Player page and if an update is needed, you can download and install it from there.
Adobe Reader
Finally, last but obviously not least, is Adobe Reader. Reader, like Flash, is another (almost) indispensable utility. There are Reader alternatives out there and you’re certainly free to explore your options, but for many a user, Adobe’s offering is one of the first things (apart from another browser) that they install.
By default, Adobe places the “Adobe Reader and Acrobat Manager” into your system’s startup routine. This will automatically check for program updates whenever Windows starts. You can disable this of course, but then you will need to check for program updates manually.

To check for program updates manually, open the Reader application and from the “Help” menu select “Check for Updates…”.

If any updates are found, you will be able to install them, otherwise you’re good to go.

As I mentioned, there are Reader alternatives out there. At one time Foxit Reader was one of my favorites but it’s since become bloated with crap. If you don’t want to use Adobe Reader, then you might want to try Sumatra PDF, which is free, lightweight, and not Adobe.
Drivers
Drivers are the little bits of intermediary software that allow your hardware to work with Windows. Without drivers you wouldn’t be able to connect to the Internet or send things to your printer. When Windows 95 first debuted, drivers were something of a mess and in order to fully keep on top or your system, you’d have to manually install drivers from each manufacturer, and for any new hardware you added.
This situation didn’t actually start to improve until Windows XP, and didn’t become a no-brainer until Windows 7. Today, there’s almost nothing you need to do with Windows 8.x.
Furthermore, if drivers do need updating, they’ll appear in “Windows Update” under “Optional” updates.
That said, if you have a computer you want to play games on, I recommend installing the graphic card manufacturer’s recommended drivers. You’re almost certainly going to have a graphics chipset supplied by Intel, Nvidia, or AMD. The latter two release drivers for their chipsets on a regular basis so you can visit their download pages for more details:
AMD: http://sites.amd.com/us/game/downloads/Pages/downloads.aspx
Nvidia: http://www.nvidia.com/Download/index.aspx?lang=en-us
If you’re not sure whether you want to do this or you simply don’t care about gaming, then chances are you should just use the driver that “Windows Update” installs and you will be fine.
The “Task Manager” should be your first stop when nailing down performance hiccups. To access the Task Manager, you can hit CTRL+ALT+DEL and choose “Task Manager” or right-click on the taskbar and choose it from the menu.

The “Task Manager” in Windows 7 is probably familiar to a lot of you. It’s relatively unchanged between Windows versions.

The “Task Manager” in Windows 8.x has received quite a makeover but retains its essential functionality. For the purposes of this section, I’m going to concentrate on this “Task Manager” version. You should be able to achieve the same goals using the Windows 7 version, it will just look different.
The new-look “Task Manager” defaults to a very simple streamlined interface. There’s not a whole lot you can do with it other than end non-responsive applications however, if you click “more details” then the sheer power of the “Task Manager” is revealed.

The “Processes” tab lists every running process on your system. This is very useful for diagnosing hung apps and excess system overhead.

If an application “hangs” it means it stops responding, this can be a temporary situation while the computer works to free up resources, or it can mean that the application needs to be ended. In the following example I’ve purposely stressed My system with a bunch of resource-intensive tasks to show you what this looks like. Note, the application with “not responding” in red next to it.

If this happens to you and it feels like your system is dragging, you may need to free up resources by quitting stuck applications. You can try closing a problem application by trying to properly exit but if an application is really misbehaving, then from the “Task Manager” click on the problem app and then the “end task” button in the bottom-right corner.
Note, if you end an application abruptly, you will possibly (probably) lose any unsaved work so use this power with great care. When at all possible, try closing other unused, running applications to try to free up system resources and/or wait for the hung application to respond.
Pinning Down Performance Bottlenecks
Applications don’t always need to become non-responsive for your system to slow to a crawl. At times like this, it’s great to use the “Task Manager” to check where you might have performance bottlenecks. Looking at the “Performance” tab, you see a freshly restarted system under minimal load. Across all our metrics, you see that my system is having no performance problems.

Check out what happens however, when I place my system under extreme load. In this example, I’ve fired up a virtual machine, which causes RAM and CPU usage to spike and destabilize our system.

See here I am utilizing 100% of my CPU.

And there’s also a sharp spike in disk I/O, which can cause our system to stutter and lurch along as well.

Sometimes if you stress your system to the max, a warning box will pop up telling you that your memory is low, and you need to close programs to free up resources.

The dialog box has a button “close programs” and it will list various applications that it will end. Note, you may actually be using some or all these programs so simply clicking that button may have undesirable results.
Obviously, there’s a more refined way to diagnose system slowdowns. In our “Task Manager” you can order applications and services by clicking on the appropriate header (“CPU” in the screenshot). Here the “VMware Workstation VMX” process has our processor tied up pretty well and overall it is pegged at 99%. There’s basically no room for any other process.

Note here in the next screenshot, I’ve ordered everything according to “memory” to give you an idea of which things can help you free up RAM in a pinch. In this case, I can close Google Chrome, Dropbox, and MusicBee and recover quite a bit of memory.

The “Task Manager” is invaluable to any Windows user but it’s important to remember that it is only a diagnostic tool so knowing how to apply the information it conveys and make intelligent maintenance decisions can alleviate a lot of common system slowdown woes.
March 13, 2014
iambiebs | Make A Comment | nerdisms, Tech
So what do I mean when I say “securing” your system? Surely I don’t mean strapping it to a desk with a padlock. Well, that’s one way you can lock your computer down but what I’m talking about is throwing up a potent defense that will halt most malware infections before they even get on your computer.
I refer also to the many browser extensions you might have installed, many of which may be spying on your surfing habits. And, of course there’s securing your system against prying eyes with strong passwords. Think of this lesson as the “motherly advice” part. Most of this stuff seems like common sense but it’s amazing how many users still fall for old tricks and engage in bad practices.
Avoidance is your Best Defense
Before I get to the concrete steps, let’s talk about something more pragmatic: avoidance. While I can blame the underbelly of the Internet for many of our malware woes, the fact remains, the user is still most often responsible for introducing malware to their systems. In a perfect world, it wouldn’t matter and I could just install whatever I want with no fear of consequences. But for whatever reason, be it sadism or profit, so-called hackers seem bound determined to ruin our days. But it’s not quite so doom and gloom. You do have some control over this and avoid “Death by Toolbar”.

Dodgy websites
How’s that site look? Does it look like the Internet equivalent of seedy dive bar? Fact is, most of the websites out there are just fine but every now and then, there’s that one that isn’t. When you have any misgivings about installing a program from a suspicious source, don’t. Take some time and research it, see if anyone has complained about it or if has been reported it as malicious.
Distrust e-mail
Stop if you’ve heard this one before: don’t open attachments or links from unknown or suspicious sources. Don’t even trust your friends and family. Spoofing email addresses is not a difficult task. While most people use webmail nowadays, which usually has virus scanning incorporated into it (for example, Gmail scans at the server level so malware is less likely to even reach you), if you have a business or regular ISP e-mail account, you still need to exercise care in case something slips past.
Insert with caution
Let’s say someone gives you a thumb drive with some important files they want to share. It’s fantastic now that I have little gigabyte+ drives that I can save hundreds of files to. But, just like CD-ROMs and floppy disks, removable media is inherently risky. Never simply open these files without at least first scanning them for malware.
Pop ups of doom
Have you ever seen those little pop ups while web browsing that suddenly appear telling you have viruses on your system? Or, that your system is too slow and needs fixing? These pop ups act like they’re trying to help you out, but what they really want you to do is help them get their malware or adware into your system. If those popups are in the web browser window, they probably aren’t real. Don’t fall for these scare tactics; close out that window and go about your business.
Sneaky bundling
A lot of software comes bundled with other software that you are tricked into mistakenly installing with a bunch of redirection and fakery. You may be accepting the licensing agreement for that piece of software, or you may simply be agreeing to install a bundled toolbar that tracks your web surfing habits.

When you’re installing anything, you don’t necessarily need to read all the fine print (only a few people really do) but you should at least know what you’re agreeing to. Are you agreeing to the actual program you downloaded, or is it some “search helper” or toolbar that you can never seem to get rid of? Bottom line, read carefully.
It’s also worth noting that you should really consider whether or not you need that freeware application in the first place. If you can’t think of a reason that you must have it, you should probably skip the installation process entirely.
What’s in a torrent?
If you download anything off a peer-to-peer network, you’re always at risk of getting more than you didn’t pay for. When at all possible, scan anything your get from these sources or simply download from a more reputable source.
Using anti-virus
Using an anti-virus program is step 1 in securing your system. Okay, picking a strong password is step .09 but I’ll get to that in just a bit.
Anti-virus? Don’t I mean malware? Technically, yes, we can define malware as any piece of software intent on causing harm to your system and the data contained therein. This may include, but certainly isn’t limited to, viruses, Trojans, keyboard loggers, adware, rootkits, and more. But, we all still call it anti-virus or AV, so I’ll leave it at that.
Your anti-virus software should fulfill a few requirements
- It should update automatically with the most current AV definitions.
- It should reside in your system’s memory and continuously scan for threats.
- And, in doing so, it shouldn’t detrimentally affect your system’s performance.
Almost all the AV software on the market will do the first two items perfectly well. In case of the last one, some AV programs create very little system overhead while others are pig-like. There’s also the matter of effectiveness, not all programs are created equally and some catch more malware more consistently.
So, which one?
Deciding on anti-malware protection can be daunting. After all, do a simple search for “anti-virus” or “malware protection” and you’re bound to get dozens of results.
There once was a time when I could simply recommend Microsoft Security Essentials for Windows 7 and Windows Defender for Windows 8.x. But recently even Microsoft admitted that MSE and Defender may not be completely effective and users are recommended to find a third-party option. So what are those third-party options?
When judging anti-virus (AV) software, AV Test does a fairly good job of laying out all the choices in a clear manner. Like I said, We have an abundance of choice but only a few are free. You’re more than welcome to peruse the list but let’s highlight some of the free stuff. After all, Windows costs quite a bit of money, I shouldn’t have to pay more to keep it running properly.
These are four of the higher rated AV programs on the market. Each come with a free, basic, anti-virus component.
| Product |
Platforms |
Pay version |
Free Trial |
Download Page |
| Ad-Aware |
PC only |
$24.00 to $48.00 |
Yes |
http://www.lavasoft.com/products/ad_aware.php |
| Bitdefender |
PC, Mac, Android |
$69.99 to $79.99 per year |
Yes |
http://www.bitdefender.com/solutions/free.html |
| AVG |
PC, Mac, iOS, Android, Windows Phone |
$54.99 |
Yes |
http://www.avg.com/us-en/free-antivirus-download |
| Avira |
PC, Mac, iOS, Android |
$44.99 – $133.99 |
Yes |
http://www.avira.com/en/avira-free-antivirus# |
Disabling Windows Defender to Install New AV
On Windows 7, you have to install anti-virus manually so any of the above-referenced software is a great place to start. All of the free versions will be more than adequate to protect your system against most threats. It’s important to keep in mind that new malware appears every day, so there’s always the chance that some “zero-day” threat will infect your system but that’s honestly the chance you take by being online in the first place.
On Windows 8.x, Windows Defender is installed and enabled by default. In order to avoid having conflicts with any new AV software you install, you should first disable Defender and then immediately install your new AV.
To disable Windows Defender, open it from the Control Panel. Click on the “Administrator” option from the “Settings” tab. uncheck the box next to “Turn on this app” and click “Save changes”.

A box will pop up warning you to check your AV software in the “Action Center” control panel. You can simply dismiss this box and install your new software.

Use Malwarebytes for spyware
Whatever AV scanner you choose, you should always have some kind of back up, just in case something slips through.
No one anti-malware scanner seems to completely do the trick, however, you can usually get by with one and back it up with Malwarebytes.

Malwarebytes has been the go-to anti-spyware app of choice for geeks for as long as I can remember. I like Malwarebytes because it’s good at what it does, rooting out spyware that your regular AV program might have missed.
You can purchase Malwarebytes, which will extend other benefits. It can also serve well as your primary malware software, however I like that you can install it as a standalone app and run it as needed. This allows you regular AV software to function normally without any conflicts.

The full version does offer some nice features like real-time protection and scan scheduling, but the free version is more than capable of serving your needs.
Scanning Your System with Malwarebytes
When you start Malwarebytes, it may ask you to update your malware definitions. Click “Yes” to start the process, it should only take a few minutes.

The main scanner window has nine tabs but I want to concentrate solely on the “Scanner” tab for our purposes. The “Scanner” tab gives you three options. You can perform a “quick scan” that simply checks your system for malicious software. You can also do a “full scan”, which will allow you to select the drive or drive(s) you want to check. And finally, you can do a “flash scan”, which will check your memory and auto run (removable media such as flash drives). This last option is available only to users who buy the full program.

For most, the quick scan should be sufficient. As you can see in the following screenshot, it only took a few minutes to scan our system, and Malwarebytes found a total of 5 potential threats.

Click “OK” to see what the program found. Check off everything you want to remove (if it isn’t already selected) and click “remove selected” to clean your system.

Once finished, Malwarebytes will generate a log and save it in its program folder. This will allow you to later review your removal history, just in case you want to research the threats the program removed.

If necessary, you may need to restart your system to entirely complete the removal process.
Browser extensions and plugins
How much do you know about those browser extension and plugins you have installed? Well, as you may or may not be aware, many Google Chrome extensions are sold to malware distributors. According to this article published recently on How-To Geek, your browser extensions are basically spying on you, the gist of which is:
- Browser add-ons for Chrome, Firefox, and probably other browsers are tracking every single page you visit and sending that data back to a third-party company that pays them for your information.
- Some of these add-ons are also injecting ads into the pages that you visit, and Google specifically allows this for some reason as long as it is “clearly disclosed”.
- Millions of people are being tracked this way and they don’t have a clue.
The HTG article provides a great deal of invaluable information on how this happens but in sum:
- Many extensions insert ads into pages you visit and track you as you surf the Internet.
- Bad behavior is buried in tedious end user license agreements (EULA) and complicated privacy policies.
- An extension can often change hands or update without your knowledge or permission
- Some extensions include tracking code that is disabled by default, which can then be enabled remotely after you install the extension.
The long and short of it is that it’s all too easy to surrender a great deal of personal and personally identifiable information with just a few careless clicks of the mouse.
But What about Plugins?
Further complicating matters are plugins. Everyone knows what plugins are. Plugins have been around for as long as graphical Internet browsers (think Netscape Navigator) have been in existence. A plugin is basically a little helper that allows you to perform actions such as streaming video (Silverlight, Flash) or viewing documents (Adobe Reader) in your web browser.
For the most part, plugins are normally harmless and not usually associated with malware as much as they are for security exploits. Notably, Adobe Flash and Oracle Java seem to run into more than their fair share of problems. The biggest problem with plugins isn’t so much their insecurities, it’s their inherent usefulness and how much of a pain it is to surf without them. For example, without Flash, you can’t watch YouTube videos, without Silverlight you can’t watch Netflix movies, and Java, while seemingly useless 99% of the time, somehow manages to be that one plugin you need for that one specific task that you can’t accomplish any other way.
The good thing is, despite the risks associated with plugins and extensions, you can easily handle any problems, present and potential, with a few easy steps.
Auditing your Extension and Plugins
There’s no easy way to tell if your extensions are spying or if your plugins are insecure. Here’s a list of extensions that you can compare to your own, but it’s nowhere comprehensive. At last glance there are hundreds and hundreds of extensions available for Google Chrome, Mozilla Firefox, and Internet Explorer.
If you use any or all of these three browsers, and it’s likely you do, then you should know how to handle add-ons for each. Treat extensions and plugins like you would system applications, if you use an extension every day, or at least regularly, then you should keep it.
If you don’t use an extension, or you can’t remember why you installed it, or you don’t remember installing it, then you should by all means remove it, or at least disable it. Of course, if you have any doubts, do a simple Google search on whether anyone has cited it as spyware. If the extension has reviews, then you should read those too.
Plugins, on the other hand, should be kept updated and/or disabled unless you need them. Obviously you’re going to want to leave your Flash plugin enabled, it would be a pain to always have to enable it every time you wanted to watch a YouTube video. But, you still want to make sure it is always up-to-date.
Google Chrome
I start with Google Chrome because it’s our favorite and chances are you either use it or Internet Explorer. In Chrome, you can quickly access your extensions by typing “chrome://extensions” which will show the “Extensions” settings.
Very simply, if you want to disable an extension, uncheck the “Enabled” box and if you want to remove it, click on the trash icon.

Similarly, type “chrome://plugins” to see the “Plug-ins” installed on your browser. Note, you can quickly enable/disable by clicking the link. If a plug-in needs to be updated, it will give you an “Update” option (you should click it).

Internet Explorer
Internet Explorer doesn’t have as many add-ons but that doesn’t mean you shouldn’t know how to administer them. To open the add-ons settings in IE, click the small gear icon and select “Manage add-ons”.

IE lumps extensions and plugins together. To disable anything, right-click on the item and select “Disable”.

Mozilla Firefox
Mozilla Firefox does have a lot of extensions and many of those can be suspicious too. To open the “Add-ons” settings, click on the orange Firefox button in the upper-left corner.

The “Add-ons Manager” collects everything in one place. Click on the extensions tab to attend to those. As you can see, you simply need to click the appropriate button to disable or remove any extensions associated with your Firefox installation.

Plugins are a bit different. Firefox lets you decide whether to allow a plugin to ask, always, or never activate. This means, you can either leave a plugin enabled, completely disabled, or you can decide when the time comes whether you want to use it.

At the top of the plugins screen is a gear icon that allows you to choose your update methods. Note, “Update Add-ons Automatically” is enabled by default.

Passwords and securing your system
Stop for a moment and think about that laptop computer or tablet you carry around wherever you go. Pause and reflect upon your computer, slung across your shoulder like a modern day shield. You carry around your digital lives, storing phone numbers, addresses, shopping habits, friends and family photos, e-mail, and many more pieces of information that, even as little over a decade ago, I would have never thought of as possible.
Those little devices I take for granted contain a treasure trove of information. If left unprotected, they pave the way for cyber-thieves to access our most valued personal data: bank and credit card accounts, social security numbers, where I live, who I interact with, etc. These devices are a portal into our private worlds. You wouldn’t walk around with your address and phone numbers emblazoned upon your shirt but, leave your laptop or tablet behind somewhere and you might as well have done just that.
Luckily, there’s a very simple and practical way you can safeguard your data. It doesn’t require a major investment of cash or time, just a little thought and creativity. A strong password can easily place a virtually impenetrable firewall between you and even the most determined digital burglars. Passwords represent the first, and often last, line of defense between you and your piece-of-mind. But the keyword here is “strong”.
The strength of your password makes all the difference between foiling even the most determined of crooks and simply wasting a little bit of their time before they guess or hack their way in. Think of a password as a moat surrounding your castle. Will your moat be a watery canal that someone can lazily float across or will you stock it with piranha, crocodiles, and submerged hazards? How well you protect yourself is entirely up to you.
Creating Strong Passwords
First things first, to create a good, strong password you want to avoid some very common mistakes.
- Don’t use a dictionary word. One of the primary methods for cracking a password is a “dictionary attack”.
- Don’t use commonly misspelled words, abbreviations, or words spelled backwards.
- Don’t use a sequence of numbers or letters such as 12345678 or QWERTY.
- Never use personal information such as your name, pet’s name, your birthday, or any other similar information that can be easily researched or socially engineered.
- Never write down your password or share it with anyone.
Keys to Strong Password Creation
Knowing this, there are several keys to creating a strong password.
- A strong password should be a mixture of letters (upper and lower case), symbols, numbers, and punctuation.
- It should be at least eight characters. Short passwords are easier to crack.
- You should use a different password for every website. A cyber-thief can hack into a website with the weakest security and then use your information on ones with stronger security.
- Try to change your passwords at least once every three months. If you suspect your password has been compromised, change it immediately!
- While it is a good idea to substitute symbols for letters, most password hacking software will automatically account for many common conversions such as “and” for “&” and “to” for “2”.
- Take advantage of all the characters on your keyboard, not just the ones you use every day.
- Make things easier by using a password manager such as LastPass or KeePass. That way, you can have as many long, complex passwords as needed and you only need to remember one.
Now Create Your Own …
Now that you know what and what not to do, let’s create an example strong password that you can easily remember.
- Start with a simple sentence: Strong passwords are the best!
- Next, remove the spaces between each word: Strongpasswordsarethebest!
- Mix things up a bit by intentionally shortening or misspelling some words: Strawngpassw0rdsRtehBest!
- Finally, you can make the password even stronger by adding some numbers: Strawngpassw0rdsRteh2014Best!
And really, that’s all there is to it. You can check the strength of your password by running it through a password checker, which can be easily found online. By always following these simple rules and then utilizing these methods to create strong passwords, you can ensure that your personal information will be relatively safe and sound from prying eyes.
Security Questions Can Be Like Password Kryptonite
In recent years, many websites have started instituting security questions as a means of helping people remember or reset forgotten passwords. As first glance, this seems like a great idea. Answer a few simple questions, like the name of your favorite pet or the town where you were born, and you’re given the option of then resetting your password.
Security questions are an effective way of saving companies money on support costs because users no longer have to call in to reset their passwords. And, they are also safer than trying to identify a user over the phone. The biggest problem with this method is that answers to these questions can often be discovered with a little research and social engineering.
Unfortunately, there’s no easy answer to the security question problem. “Good” security questions shouldn’t be easy to guess and the answers shouldn’t change. Your favorite book at the moment may be “War and Peace” but say you read “Crime and Punishment” and it becomes your new favorite. A good security question then would not be “What is your favorite book?” because the answer can change over time.
Security Questions: Dos and Don’ts
Here are some handy tips you can use to overcome the inherent problems associated with security questions.
- Invent bogus answers that only you will know. This helps prevent someone from using social engineering to gain access to your account.
- Write down your question/answer combinations or better yet, use a password manager such as LastPass or KeePass to store them.
- Don’t pick the same security questions for every account. For example, don’t answer the mother’s maiden name question for your e-mail and your social networking account(s).
- Don’t answer questions that involve personal information or can be easily guessed.
- Answer questions such as you would when creating a strong password. Use special characters, numbers, and symbols instead of letters.
As risk-prone as they are, security questions currently represent the best available idea for easily resetting your password. Until someone comes up with a better solution, a user’s password security will only be as good as the questions that are asked, and the cleverness of the answers you provide
March 12, 2014
iambiebs | Make A Comment | nerdisms, Tech
Computer cleanup is the one thing you can do every day that will keep you flush with disk space and help you free up valuable system resources. Furthermore, actual physical cleanup, as in dusting, will allow your computer to literally breathe easier, and in turn prolong the life of your system.
In the first section, I’ll delve into cleaning up your system including routing out all those pesky startup items, removing temporary files, and uninstalling old, unused applications. From there, I move on to disk maintenance. This task has gotten considerably easier in recent Windows versions but understanding your options is still important.
Finally, as I mentioned earlier, there’s dusting, as in literal removal of hair and dirt from your computer’s interior. I want to stress how much more effective a computer is at dissipating heat and cooling its internal components when they’re not coated in a thick coat of fur.
Disabling startup items
One of the best ways to unburden your computer and quickly free up resources, is to disable items that automatically launch when Windows boots. These startup items not only suck up system resources like little vampires, they also often cause your computer to boot longer.
The old school way to deal with startup items is to use the “System Configuration” (“SysConfig”) utility on Windows 7. Launch a “Run” window by typing “WIN + R” and then “msconfig”.

On the “System Configuration” utility, select the “Startup” tab. You do want to exercise some caution here. While you won’t break your system by disabling everything, you may disable some programs that are genuinely useful, like Dropbox.

In the preceding screenshot, there’s not a whole lot to pore over because it was taken on a virtual machine that has the bare minimum of programs installed. Regardless, to disable a startup program, uncheck the box next to it, and restart your system.
Let’s look at our Windows 8.x setup to see a more useful example. If you try to use “Sysconfig” on Windows 8.x, it will simply redirect you to the “Task Manager”, which can be more easily accessed by going directly to it either from the Taskbar:

Or simply hit “WIN” and type “task” and it should appear as the top search result:

It’s worth noting that you can also use the CTRL + SHIFT + ESC shortcut key combination to bring up Task Manager without clicking anywhere.
When the “Task Manager” opens, select the “Startup” tab and behold the glory of your computer’s burdens. You can see your startup items, their status, and the impact they have on your system. You can sort them of course, by clicking the headers. In the following screenshot, I’ve sorted by “Startup impact”.

If you’re unsure what does what, you can right-click on any item and selet “Search online” to find out exactly what something is and what it does.
According to Microsoft, impact is based on how much CPU and disk usage occurs at startup:
- High impact – Apps that use more than 1 second of CPU time or more than 3 MB of disk I/O at startup
- Medium impact – Apps that use 300 ms – 1000 ms of CPU time or 300 KB – 3 MB of disk I/O
- Low impact – Apps that use less than 300 ms of CPU time and less than 300 KB of disk I/O
One second might not seem like a lot, but keep in mind, the above screenshot depicts a system that doesn’t have a ton of stuff installed. Imagine a system with many more things in the startup routine. If you have a dozen high impact startup items in addition to the other medium and low impact items, and they’re all requiring CPU time and disk I/O, startup time increases proportionately.
Microsoft breaks down startup apps and provides guidance on how to deal with several categories of startup apps, including utilities that sync your PC or for backup and recovery, updaters, notifiers, and more.
It’s safe to say that in any event, you can disable most, if not all startup items and it will not adversely affect your system. That said, as I mentioned earlier, if you do disable everything, you may lose functionality that you otherwise wanted. In the above case, if I disabled “Dropbox” it would no longer start automatically and sync changes. I’d instead have to manually start it, so I might as well leave it enabled.
Disk Cleanup
The “Disk Cleanup” utility is a very simple tool that allows you quickly delete stuff like temporary and cache files so you can free up space on your hard drive(s).
In Windows 7 you can open it from Start -> All Programs -> Accessories -> System Tools.
In Windows 8.x, you have several options. The easiest is to hit the “WIN” key and type “disk cleanup” and then choose “Free up disk space by deleting unnecessary files”.

When “Disk Cleanup” begins, if you have more than one drive installed, you will need to choose the one you want to cleanup first. Here in our example, I choose the system drive (C:).

The “Disk Cleanup” tool will let you scroll through and see what is taking up space. You can read a brief description of what it is you’d be deleting. You can also view the files at any time by clicking on the “View Files” button, or if you have administrative access, you can click “Clean up system files” and the “Disk Cleanup” tool will restart in admin mode.

Note here in the following screenshot, I’ve restarted in administrative cleanup mode and “Disk Cleanup” has found another 500 MB of space it can free up (Windows Update files). This will give us 455 MB versus 90 MB in non-admin mode.

Note also, in admin mode you gain another tab named “More Options”, which gives us further ways to free up valuable disk space. Of particular note here is the “System Restore and Shadow Copies” option, which deletes all but the most recent “system restore” points. If you’ve been using your computer for a while and you’ve never cleaned out your restore points, this option can sometimes free up gigabytes of space without adversely affecting your computer – assuming everything is running smoothly at the moment so you don’t need to roll back any recent changes.

Note also, the “Programs and Features” clean up button. If you click this, it will open the “Programs and Features” control panel, which will let you uninstall unnecessary and unused applications, which I’m going to now talk about in the next section.
Uninstalling Applications and Freeing up Disk Space
Let’s say that you disable something in your startup items, but then you realize that you don’t really use that program. In that case, why not just uninstall it? That way, not only do you remove the startup item, but the whole useless application, thus freeing up disk space in the process.
On Windows 7 and Windows 8.x, removing an application is accomplished by opening the “Programs and Features” control panel. On Windows 7, open the Control Panel from the “Start” menu.

On Windows 8.x, you can access the “Programs and Features” control panel directly by right-clicking on the “Start” button and selecting it from the context menu.

With the “Programs and Features” control panel open, you can click on the application you want to uninstall.

In the above example, I see that from the previous section that Google Drive has a high impact on startup, and since I use box as my primary cloud service, I can just remove Drive and use it when I need to through the web interface.
The approach you take to this is completely up to you. You may decide you want to just disable the startup program or remove the whole shebang. That said, there’s an even easier way to do all this.
Using CCleaner
CCleaner is a free program from Piriform software that takes the work out of cleaning up your computer. Make sure that you download the “Slim” installer version that doesn’t contain any toolbars or other crapware. Yeah, it’s ironic that a software named “crap cleaner” actually distributes more crapware by default, but as long as you don’t download the wrong version you’ll be fine. And it is otherwise a good piece of software.
When you first execute CCleaner, it opens up to the “Cleaner” screen, which allows you to clean up your system such as browser cache files, recently used items, and also clear things related to specific “Applications” such as cache and log files.
When you click “Analyze” all the stuff on your system that can be deleted will be displayed. If you don’t want to delete something, then you can uncheck it. Otherwise click “Run Cleaner” to scour your system clean. In this example, when I clicked the cleaner, I was able to clear up about 4 gigabytes of drive space!
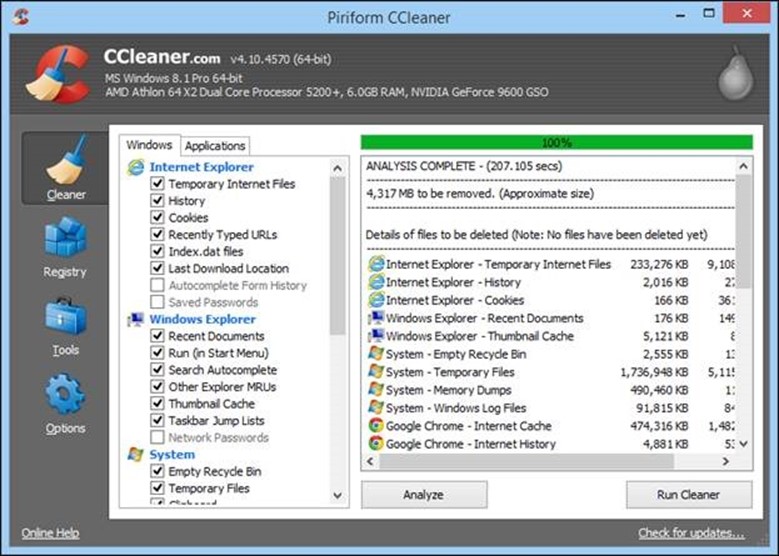
What I’m really interested here is the “Tools” functions, specifically “Uninstall” and “Startup”. On the “Uninstall” pane, you can bypass the “Programs and Features” control panel altogether and uninstall stuff here. Simply click the item you want to remove and click “Run Uninstaller” to begin the removal process.

Moving to the “Startup” tools, I see we have the same kind of options as in “Sysconfig” and the “Task Manager”. You can disable/enable anything by selecting the item or items (hold the “CTRL” button to select multiple items), then click “Disable”.

While this method isn’t as informative as the Task Manager’s with its “Startup Impact”, it’s just as effective, and puts everything in one place. If you want a more extensive tour of CCleaner’s features, then I urge you to check out this article.
Disk maintenance
Disk maintenance is kind of a misnomer. You don’t really need to “maintain” anything and in fact, your computer will likely do a lot of stuff automatically to keep you disks running optimally. Nevertheless, I feel you should educate yourselves on how disk drives work, and what you can do to extend their life.
SSD vs. HDD
Today, hard drives in computers come in two flavors: the SSD and HDD. An SSD or solid state drive, is sort of a container full of flash memory. Basically it’s RAM, but unlike RAM, the content in an SSD retain their contents after you turn off the power.
Hard drives by contrast, are comprised of quickly spinning platters, on which all the data in your computer is written. To find and retrieve the data, a hard drive has heads, which read the surface of these platters kind of like you might walk to the stacks in a library and retrieve a book or books from their shelves.
SSDs, because they’re so similar to RAM, are superior to old school spinning hard drives because they’re consistently faster at accessing and retrieving data. In other words, when you load an application from an SSD, you don’t need to wait for the head to find and read the data on spinning platters, it’s just there and the only delay you might experience is the time it takes for the SSD to read its contents and store it in the computer’s memory.
Do you need to defrag?
The thing about HDDs is that over time, the books you take off the shelf are replaced by other books, any books your want to return to the stacks are stuck wherever there is space. So instead of having all your data in contiguous chunks, it ends up spread about or “fragmented”. Over time, it becomes increasingly more time consuming to retrieve your data because the hard drive has to read part of it from one area on the platter(s) and another part of it somewhere else.
Defragmenting software is meant to take all those books and put them back together on their shelves so the computer can find them again more efficiently. This works to great effect on traditional spinning platter drives, but not so much on solid state drives, and can actually decrease the lifespan of your SSD.
You can only write to an SSD a finite number of times. Over the course of time, it will lose its ability to hold on to the data and go bad. When you defrag, it reads data scattered about your hard drive, stores it in RAM, and then deposits it where it needs to be. If necessary, it will read data that is stored in the wrong place and deposit in another empty space on the drive in order to put all the data back together.
Doing this, as you can imagine, means that the drive is read and written more than with normal use and as such, defragging effectively shortens the life of an SSD by unnecessarily writing data to the drive. In truth, you don’t even need to defrag an SSD because of the way they work.
How to Defrag
Defragmenting your drive is easy and the computer likely already does it for you around once a week. Still, if you use your computer a lot and do a lot of things where you’re copying many files to and from the hard drive, then you may see some fragmentation. And while I don’t think it will be enough to really slow your system down, you can still initiate a manual defrag anytime you want though to be honest, it’s not as much fun as the animated defragmenter on Windows 9x.
You can launch the defragmenter in Windows 7:
All Programs -> Accessories -> System Tools -> Disk Defragmenter
Or simply click on the “Start” button and type “defrag” in the search box.

Similarly, the fastest way to open the defragmenter in Windows 8.x is to hit the “WIN” button and type “defrag”.

Note, in Windows 8.x, the defragmenter has been renamed to “Optimize Drives” because you can’t defrag an SSD. Instead, the drive optimizer “trims” your SSD, which essentially means it tells the computer which parts of your drive no longer contain data and frees them for later use.
As you can see in the example below, you see several drives to choose from and the optimizer lists your drives’ media type so there’s no guessing which is an SSD and which isn’t.

Click the “Change settings” button to access further options.
If you want to change the optimization schedule, you can have it run on daily, weekly, or monthly basis, or you can turn it off altogether. Remember though, you will need to optimize your drive manually if you do turn off the schedule.

If there are any drives you don’t want to optimize automatically, then you can deselect one or all the drives from their optimization schedules. If you do this however, remember you will need to perform optimizations manually.

You may not do Windows, but you’ll still have to dust
There are many reasons you should routinely clean, as in literally sweep out and dust your computer.
There are a couple of really good reasons you should do this and they all have to do with heat. Heat is hard on electronics and when hair and dust collect on your computer’s internals, it essentially blankets your components and prevents heat from escaping.

Further, over time your system’s cooling fans become clogged and caked with dust, which compromises their effectiveness.

So, what you’re dealing with is a system that cannot quickly shed heat and thus ends up cooking itself. You can usually tell when you need to clean your computer by looking at the intakes and exhaust ports. Usually it’s as easy as glancing at the little holes that allow air to enter and exit. If those are covered or caked with dust, then it’s time to clean your computer.

You’ll have to shut down and unplug your computer before you begin, and then I recommend you take the entire unit outside. Once you start cleaning it out, all that dust and hair that has collected inside will need to be dislodged. You don’t want to introduce, or reintroduce all that into your house.
Canned air or vacuum?
While it may see easy to simply get out the vacuum cleaner and suck all that stuff out, don’t. Vacuum cleaners can discharge static electricity onto your computer’s delicate electronic components. I recommend canned air or a small air compressor, to blast the dirt out.